Showing posts with label Flash Settings. Show all posts
Saturday, August 3, 2013
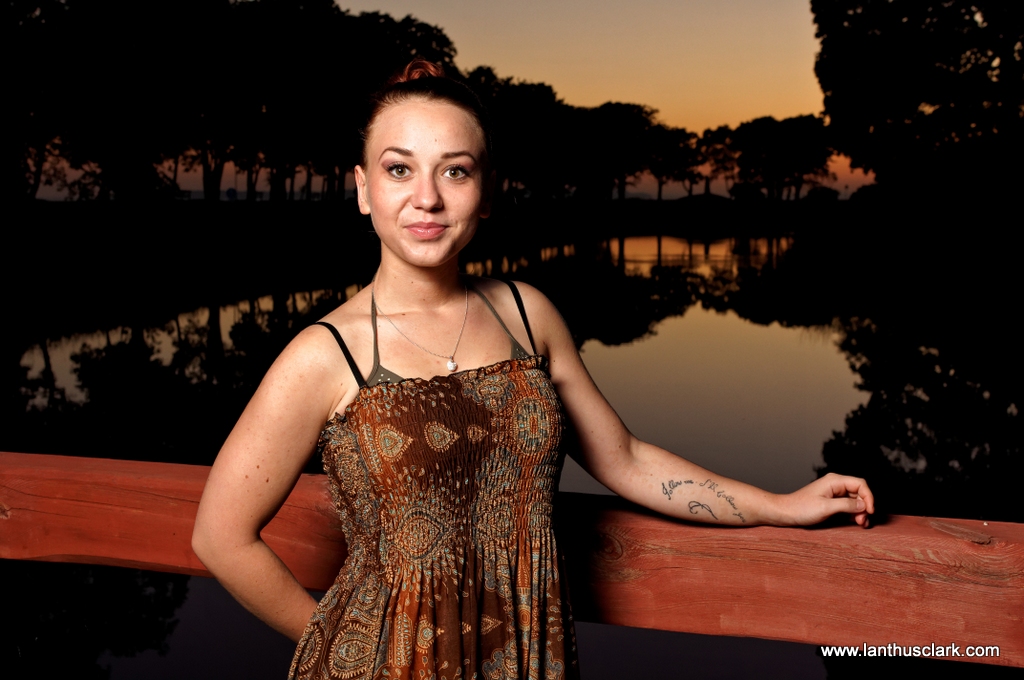
Portraits are about People! (2)
Nikon sb700 Speedlight on a pole shooting through a smallish Elinchrom shoot through umbrella to camera left and triggered via Nikon's super CLS wireless trigger system. Nikon D90 on manual mode at 1/60s, f7.1, ISO 200, handheld, with the wonderful Nikkor AFS 35mm DX f1.8 lens attached.
Taken on a bridge over the moat at the Landskrona Citadel shortly after sunset.
Tuesday, January 29, 2013
Sunflower Centre
Nikon D90, AF-S DX Micro Nikkor 40mm f/2.8G, ISO200, Manual mode, f8, 1/125s, Nikon sb700 triggered wirelessly via CLS and bounced into an umbrella to camera left.
Wednesday, June 13, 2012
How Getting Creative with White Balance can add a little Zing to your Product Photography!
Ok, so how to add a little something to a pic by fiddling with the white balance a bit? First, I took a standard pic of my daughters sneakers. What do you mean that's not something you usually do? Just go with the flow and stop arguing with me ok!
Standard pic of daughters sneakers:
This was taken with two Speedlights to light the sneakers, an sb700 to camera left on a light stand firing into a black-backed umbrella and providing the main light from the front. There is also an sb600 with a home made gobo shooting onto the white wall behind the subject (sneakers) to provide a second soft light from behind.
The result is not bad lighting wise, but what if we wanted to add another element to this to change, and hopefully improve, the look?
So what I did was attach the incandescent filter that comes with the sb700 to the front of the sb700 that was giving me my main light. It was on a light stand shooting into a black backed umbrella from camera left a little up. (See the set-up/pull-back shot further down.) The pic below is of the sb700 with incandescent filter attached and firing, while the sb600 is providing the light against the back wall. The cameras white balance is set to incandescent, so the sb700's light is correctly balanced and the sb600's light turns a lovely blue!
And here is the sb600, complete with home made cut-from-cornflakes-box-covered-in-silver-duct-tape gobo. It is held on the flash with a spare modelling balloon "borrowed" from my wife who uses these things to make balloon animals at childrens parties. Yeah, I know, but it works! ;^)
This combination now gives me a result that I like a little better! See for yourself:
And here is the promised set-up/pull-back shot:
The orange cloth is a cheap microfibre cloth which is great for cleaning surfaces, products, camera lenses, and my glasses. Never leave home without one. The table is a cheap fold down variety that is quite sturdy, but light weight. You can get them cheap at Netto in Scandinavia. That might be a bit far to travel for a cheap table if you live in the US or Africa (or elsewhere) so rather look out for one locally. But if you do decide to get one at Netto, look me up when you get to Malmö, I'll buy coffee!
One last piece of equipment that I used in this shot was the Nikon SG-3IR, which is a special cheap plastic flippy flappy thing that attaches to the cameras flash hotshoe and covers the built-in flash to filter out any light from the flash while still letting the infrared light through to maintain communications with the remote flashes without influencing the light on the subject (sneakers). It looks like so:
The photo of the sneakers was taken with a Nikon D90, AF-S DX Micro Nikkor 40mm f/2.8G, Aperture Priority mode, ISO200, 1/60s, f11.0, implementing Nikon's fantastic CLS system, hand held and processed in Adobe Lightroom 4.
Have a great day!
Standard pic of daughters sneakers:
This was taken with two Speedlights to light the sneakers, an sb700 to camera left on a light stand firing into a black-backed umbrella and providing the main light from the front. There is also an sb600 with a home made gobo shooting onto the white wall behind the subject (sneakers) to provide a second soft light from behind.
The result is not bad lighting wise, but what if we wanted to add another element to this to change, and hopefully improve, the look?
So what I did was attach the incandescent filter that comes with the sb700 to the front of the sb700 that was giving me my main light. It was on a light stand shooting into a black backed umbrella from camera left a little up. (See the set-up/pull-back shot further down.) The pic below is of the sb700 with incandescent filter attached and firing, while the sb600 is providing the light against the back wall. The cameras white balance is set to incandescent, so the sb700's light is correctly balanced and the sb600's light turns a lovely blue!
And here is the sb600, complete with home made cut-from-cornflakes-box-covered-in-silver-duct-tape gobo. It is held on the flash with a spare modelling balloon "borrowed" from my wife who uses these things to make balloon animals at childrens parties. Yeah, I know, but it works! ;^)
This combination now gives me a result that I like a little better! See for yourself:
And here is the promised set-up/pull-back shot:
The orange cloth is a cheap microfibre cloth which is great for cleaning surfaces, products, camera lenses, and my glasses. Never leave home without one. The table is a cheap fold down variety that is quite sturdy, but light weight. You can get them cheap at Netto in Scandinavia. That might be a bit far to travel for a cheap table if you live in the US or Africa (or elsewhere) so rather look out for one locally. But if you do decide to get one at Netto, look me up when you get to Malmö, I'll buy coffee!
One last piece of equipment that I used in this shot was the Nikon SG-3IR, which is a special cheap plastic flippy flappy thing that attaches to the cameras flash hotshoe and covers the built-in flash to filter out any light from the flash while still letting the infrared light through to maintain communications with the remote flashes without influencing the light on the subject (sneakers). It looks like so:
The photo of the sneakers was taken with a Nikon D90, AF-S DX Micro Nikkor 40mm f/2.8G, Aperture Priority mode, ISO200, 1/60s, f11.0, implementing Nikon's fantastic CLS system, hand held and processed in Adobe Lightroom 4.
Have a great day!
Saturday, June 9, 2012
Small Speedlight Studio Setup on a budget.
Don't have enough for those very tempting studio lights down at the camera store, but have a couple of Speedlights in your camera bag? Well then you have pretty much all you need to take some pretty cool portraits!
This is my friend Chinedu, and he just wrote a book. Once I get the details of where to buy it I will post a link right here.
I took his portrait in my small home studio in the corner of our lounge and the set-up looks more or less like this:
That's a Nikon sb700 on the stand shooting into a black backed umbrella and throwing back oodles of beautiful light onto thevictim model. On the chair at the back is a Nikon sb600 with a home crafted gobo made from a corn-flakes box covered in silver duct tape which is spitting out light onto the white wall behind the previously mentioned model. The end result is quite satisfactory, at least that's what I think!
This is my friend Chinedu, and he just wrote a book. Once I get the details of where to buy it I will post a link right here.
I took his portrait in my small home studio in the corner of our lounge and the set-up looks more or less like this:
That's a Nikon sb700 on the stand shooting into a black backed umbrella and throwing back oodles of beautiful light onto the
Tuesday, December 28, 2010
Eliminate That Hotspot!
While I was out shooting Santa last week I had some spare time to play with my flash and shoot through umbrella set-up and took the following shot:
As you can see there is a distinct hotspot in the umbrella. Not so great for even distribution of light, which is the point of the umbrella to start off with. Of course it does help to distribute light, but not as well as it could. The flash was set to about 50mm here, so I flipped out the built in diffuser and it automatically went to 14mm wide with the following result:
Beautiful even distribution of light resulting in a better wrap around effect for portraits!
The light stand used here is in fact a junky old cheap tripod with the head removed and refitted to an extension pole which I then mounted to the top of the junky old cheap tripod, I then drilled a hole through the plastic head (taking care to avoid anything important) and voila! Nice tall light stand for the man on a limited budget. Here is a close up of the head:
Some people say I'm tight, but I like to think of myself as frugal...
;-)
As you can see there is a distinct hotspot in the umbrella. Not so great for even distribution of light, which is the point of the umbrella to start off with. Of course it does help to distribute light, but not as well as it could. The flash was set to about 50mm here, so I flipped out the built in diffuser and it automatically went to 14mm wide with the following result:
Beautiful even distribution of light resulting in a better wrap around effect for portraits!
The light stand used here is in fact a junky old cheap tripod with the head removed and refitted to an extension pole which I then mounted to the top of the junky old cheap tripod, I then drilled a hole through the plastic head (taking care to avoid anything important) and voila! Nice tall light stand for the man on a limited budget. Here is a close up of the head:
Some people say I'm tight, but I like to think of myself as frugal...
;-)
Subscribe to:
Posts (Atom)


